Making a glass arrowhead: SAFETY
I have already mentioned safety on the link to this page. If you need to be reminded that glass is sharp and you should protect your hands and eyes:
STOP NOW AND PICK A DIFFERENT PROJECT!
Again the purpose of this project is to learn to take advantage of physical properties. New physical properties is the entire point of chemistry, we manipulate chemical properties and equations in order to create things with new physical properties that are better suited to our daily tasks.
STEP 1: Selecting your glass
There are a variety of sources of glass that you can use such as old spaghetti sauce jars, baby food jars, soda bottles, etc. When choosing your source you should pay special attention to the following:
A: Ensure the bottom is as flat as possible
B: The bottom should be free of lines and raised or embedded markings
C: Colored glass is better than colorless: This makes it easier to see what you're working on.
D: When I did mine... I used a brown Coors original bottle and it was fairly easy
STEP 2: Gathering your tools, despite what the various videos and how-to's show I only used two things
A: A large lag screw
B: A "pressure flaker" ... I made it myself by gluing a piece of metal coat hanger inside a dowel rod.
***When I made my second arrowhead, I used a large nail and it worked wonderfully.
|
STEP 3: Break the bottle
Put your screw/nail into the bottle pointy side down and shake. When I did mine I aimed for the edges where the bottom met the sides of the bottle. It broke off fairly clean and nice. In the video to the right, you see Vanessa Gonzalez (class of 2019) breaking her bottle. |
| ||
|
STEP 4: Clean off the hanging pieces of glass
I used the 'head' end of my lag screw and just knocked these remaining pieces off. STEP 5: Use the pressure flaker (nail) on the edges I just put the tip at the edge of the glass and pushed down into my leather palm pad. Then flipped it over and did it again. It takes off small pieces to get the edge going. This made a great first edge that was fairly sharp. It is important that you PUSH and not BANG or will break your work in two, likely causing you to start over. STEP 6: Shaping the arrowhead From here I just kept chipping away until it was in the shape that I wanted it. Pushing down and chipping off pieces until it was fairly symmetrical. STEP 7: Long flakes This took a bit of 'umph' in pushing the flaker INTO the edge made earlier, but it took off longer flakes that left the desired conchoidal scar. Remember, you are pushing chunks off... not slamming them. STEP 8: Finishing Here it depends on what you want to do, if you want a necklace you need to scratch a hole into it. For mine, I had nice notches, so it was easy to tie a thin string around it. |
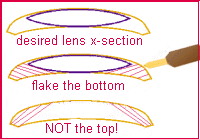
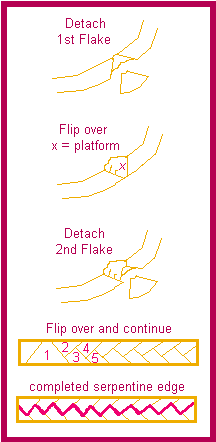
These images are borrowed from Tim Rast's flint knapping page.
|
A final note... when I first started I was a bit shy about breaking my piece of glass and ruining my work. However, you shouldn't be. First off, breaking it is kind of the point, isn't it? Second, if you figure this out at the beginning it makes your work go much faster and if you do break it at the beginning... well you haven't lost much work have you? Better to learn at the start what might break your work than toward the end.
|
|
This video from "Primitive Tim" on youtube shows a similar method. He uses a few things that make your life easier, but aren't necessary.
Notice that the conchoidal fractures cover the entire surface of both sides of the arrowhead and that the use of green glass makes this extremely easy to see. I will be looking for these as they demonstrate the difference between an intentional tool and a lucky broken shard. |
